How to Fix Terrace Cracks Permanently (Step-by-Step Waterproofing Guide)
Long-Lasting Results • Easy Application • DIY Solution
How to Fix Terrace Cracks Permanently Using Simple DIY Waterproofing Method. This guide explains the complete method used in professional waterproofing repair to fix terrace cracks permanently in residential buildings.
How to Fix Terrace Cracks Permanently – Step-by-Step Guide
Terrace cracks are one of the most common reasons for water leakage in buildings. Repairing them properly requires understanding the crack before applying any material. Some cracks are surface level, while others occur due to slab movement and weather expansion.
This guide explains:
how to identify terrace cracks
when DIY repair is safe
why leakage occurs
how to fix terrace cracks permanently
how to prevent cracks from returning
This information helps homeowners choose the correct repair approach instead of temporary patchwork.
Identify the Type of Crack First
Repairing without identifying the crack is the main reason leakage returns.
Hairline Surface Cracks
These form due to plaster shrinkage or surface drying.
very thin
usually no leakage initially
simple repair possible
Movement Cracks
These occur because the terrace slab expands and contracts.
visible lines across slab
reopen after summer or winter
main leakage source
Structural Cracks
These may indicate structural stress.
wide or diagonal
near beams or joints
Professional inspection is required.
| Crack Type | Risk Level | Leakage Chance | Repair Method |
|---|---|---|---|
| Hairline | Low | Low | Surface sealing |
| Movement crack | Medium | High | Flexible PSv-Premix Crack repair |
| Structural | High | Possible | Professional repair |
Why Water Enters From the Terrace
Water does not always drip directly through cracks; it travels through concrete pores.
Capillary Absorption
Concrete absorbs moisture and cracks become pathways.
Temperature Expansion
Heat expands the slab and cold contracts it, reopening repaired cracks.
Failed Waterproof Layer
Rigid coatings break over time and allow water penetration.
When You Should Call a Professional
Avoid DIY repair in these situations:
crack wider than 7+ mm
crack at beam or column junction
repeated cracking every season
ceiling plaster swelling indoors
Expert Recommendation
For most residential buildings, flexible waterproof repair systems provide reliable long-term results. Applying a protective coating after repair significantly reduces the chance of leakage returning.
How to Fix Terrace Cracks by Yourself – Step-by-Step Method
If you are looking for a practical way to repair terrace cracks on your own, the steps below will help you understand how to fix terrace cracks yourself. This is a DIY process and may take some time. It also requires basic tools and the right materials, such as an all-in-one Waterseal Instant Crack Filler Kit.
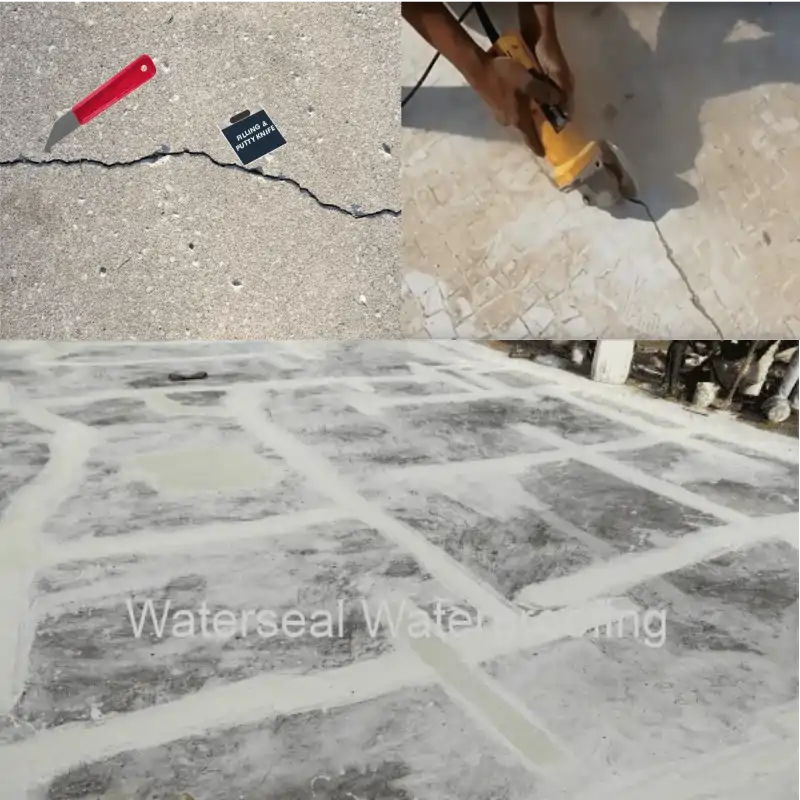
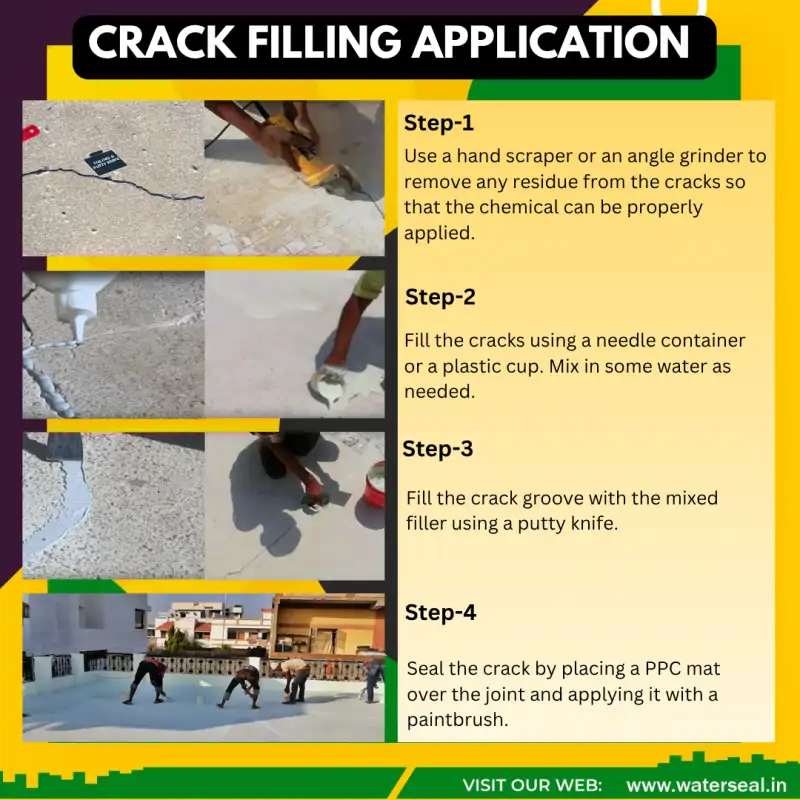
Step 1: Clean the Crack
Start by cleaning the crack thoroughly. Use a wire brush to remove dust, loose cement, crust, algae, or any debris inside the crack. Proper cleaning is important so that the crack filler can bond well with the surface.
Step 2: Cut Grooves Along the Crack
Cut grooves about 2 to 4 mm deep along the crack using a hand scraper, glass cutter, or poker provided in the kit. If possible, opening the crack in a V-shape using an angle grinder gives better results.
Keep in mind that operating a grinder machine can be risky. It should only be handled by experienced electricians or mechanics. Grinder machines are usually available on rent at electrical tool shops.
Step 3: Fill the Crack Properly
Prepare the crack-filling solution by mixing 1 part PSV Premix with 1 part clean water. Pour the mixture into the opened cracks and allow it to settle for about 10 minutes. If the solution level goes down or if the crack is deep, refill it as required.
Step 4: Smooth the Surface
Once the filler starts setting, use a 4-inch hand scraper to level and smooth the filled crack so that it blends evenly with the terrace surface.
Step 5: Protect the Crack with PPC Mat
Sunlight and heavy rainfall can cause repaired cracks to reopen. To prevent this, protecting the crack is very important.
After levelling the crack, apply PSV Premix directly over the surface using the 2-inch brush provided in the kit. Place the PPC mat over the wet coating and brush another layer on top. Make sure the mat sticks evenly to the surface and avoid trapping air bubbles.
Step 6: Allow Proper Drying
Let the repaired area dry for at least 24 hours. Avoid walking on the surface or placing heavy objects until the filler has fully cured.
Important Note
This DIY method works well for small to medium terrace cracks. However, for large cracks or widespread damage, or if you are unsure about any step, it is safer to seek help from a professional waterproofing expert.
| Method | Durability | Leakage Stop | Re-Crack Chance |
|---|---|---|---|
| Cement slurry | Very low | No | High |
| Putty filling | Low | No | High |
| Epoxy | High | Yes | Low |
| Flexible PSv-Premix Crack repair | High | Yes | Very Low |
How to Prevent Cracks After Repair
Once the repair, patchwork, or waterproofing work is completed, it is important to take preventive measures to avoid future terrace or roof cracks. Regular inspection of the roof helps identify early signs of damage before they turn into serious problems.
Make it a habit to check your terrace periodically and keep all outlet and drainage pipes clean so that rainwater does not get collected. Avoid storing unnecessary materials on the roof, such as extra bricks, sand piles, additional tiles, or unused construction waste, as these add extra load and can damage the surface.
Before the monsoon season, wash and clean the terrace properly. Also, trim any
Do not wait until small terrace cracks start leaking and damage your home. Take action early to fix cracks and prevent further damage. Remember, regular terrace maintenance is the key to a safe, strong, and long-lasting home.
Materials Required for DIY Repair
Typical terrace crack repair requires:
crack opening tool
bonding liquid
flexible PSv crack filler kit (Included-Premix Crack Filler,PPC Mat Strips,Brush and Putty Knife
application tools
waterproof protective coating
Using compatible repair materials together improves durability.
How to Fix Cracks on Terrace – Video
If you are facing terrace leakage, this video will help you see how terrace cracks can be repaired easily and correctly.
Frequently Asked Questions About Fixing Terrace Cracks
How to fix terrace cracks permanently?
To fix terrace cracks permanently, the crack must be opened, cleaned, filled with a flexible waterproof crack filler, and then protected with a waterproof coating. Surface patching alone is temporary and cracks usually reopen.
Do terrace cracks always cause water leakage?
Not always. Hairline surface cracks may not leak immediately, but movement cracks in the slab eventually allow water penetration through capillary action.
Which crack filler is best for terrace waterproofing?
A flexible waterproof crack filler is best because the terrace slab expands and contracts with temperature. Rigid materials like cement or putty usually fail and cracks reappear.
Can I repair terrace cracks myself or do I need a contractor?
Small and medium terrace cracks can be repaired using a proper step-by-step method. Wide cracks, structural cracks, or repeated cracks require professional inspection.
Why do terrace cracks reappear after repair?
Cracks reappear when rigid material is used, the crack is not opened properly, dust is left inside, or no waterproof protection layer is applied after filling
Final Recommendation To fix terrace cracks permanently:
Identify the crack type
Repair using a flexible waterproof method
Protect the terrace surface
Following this process helps stop seepage and keeps the structure dry for years. If cracks reappear even after proper repair, the issue may be structural or waterproofing related. In such cases professional inspection becomes necessary. Learn about terrace waterproofing solutions →